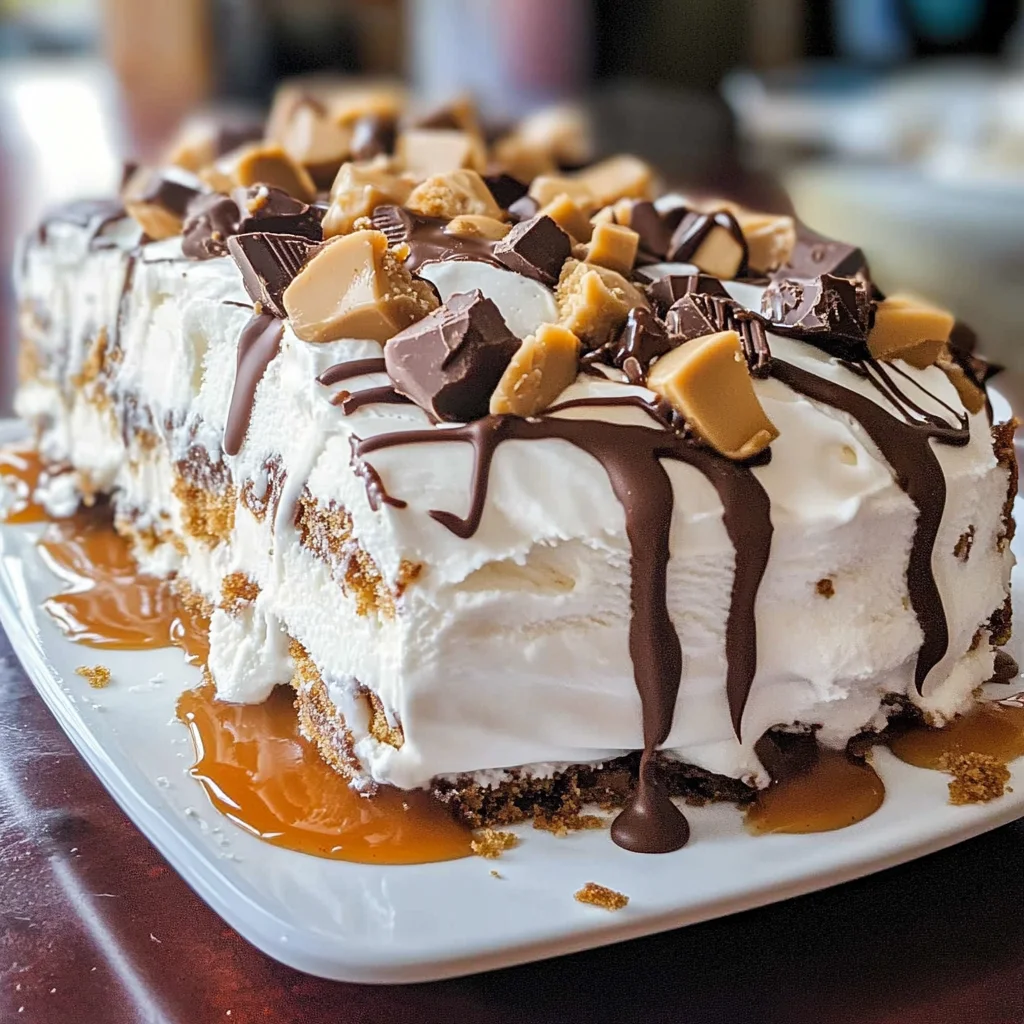
Chocolate and peanut butter come together beautifully in this Reese’s Ice Cream Cake! This dessert is perfect for any celebration, whether it’s a birthday, holiday gathering, or just a sweet treat to enjoy on a warm day. Its layers of rich flavors and creamy textures make it a favorite among chocolate and peanut butter lovers alike.
Why You’ll Love This Recipe
- Easy to Make: With just a few simple steps, you can prepare this delicious cake in no time.
- Crowd-Pleasing Flavor: The combination of chocolate and peanut butter is always a hit at parties.
- Versatile Dessert: Perfect for birthdays, picnics, or as a fun family treat.
- No Baking Required: Assemble the cake without turning on the oven – ideal for hot days!
- Customizable Layers: Feel free to add your favorite candies or sauces to personalize this dessert.
Tools and Preparation
Before you start creating your delicious Reese’s Ice Cream Cake, gather the necessary tools. Having everything ready will make the process smoother and more enjoyable.
Essential Tools and Equipment
- Serving platter
- Measuring cups
- Mixing bowls
- Spatula
Importance of Each Tool
- Serving platter: A large, flat surface is essential for assembling your ice cream cake with ease.
- Measuring cups: Accurate measurements ensure that each layer has the right amount of flavor.
- Mixing bowls: These are great for melting ingredients and combining sauces.
- Spatula: A good spatula helps in spreading whipped topping evenly around the cake.
Ingredients
Chocolate and peanut butter come together in this simple, crowd-pleasing ice cream cake!
For the Cake Layers
- 18 vanilla ice cream sandwiches
- 1 cup peanut butter, melted
- 1 9.5 oz package Reese’s peanut butter cups (12 total)
For the Sauces
- 6 tablespoons caramel sauce
- 6 tablespoons hot fudge sauce
For Topping
- 2 8 oz containers whipped topping
How to Make Reese’s Ice Cream Cake
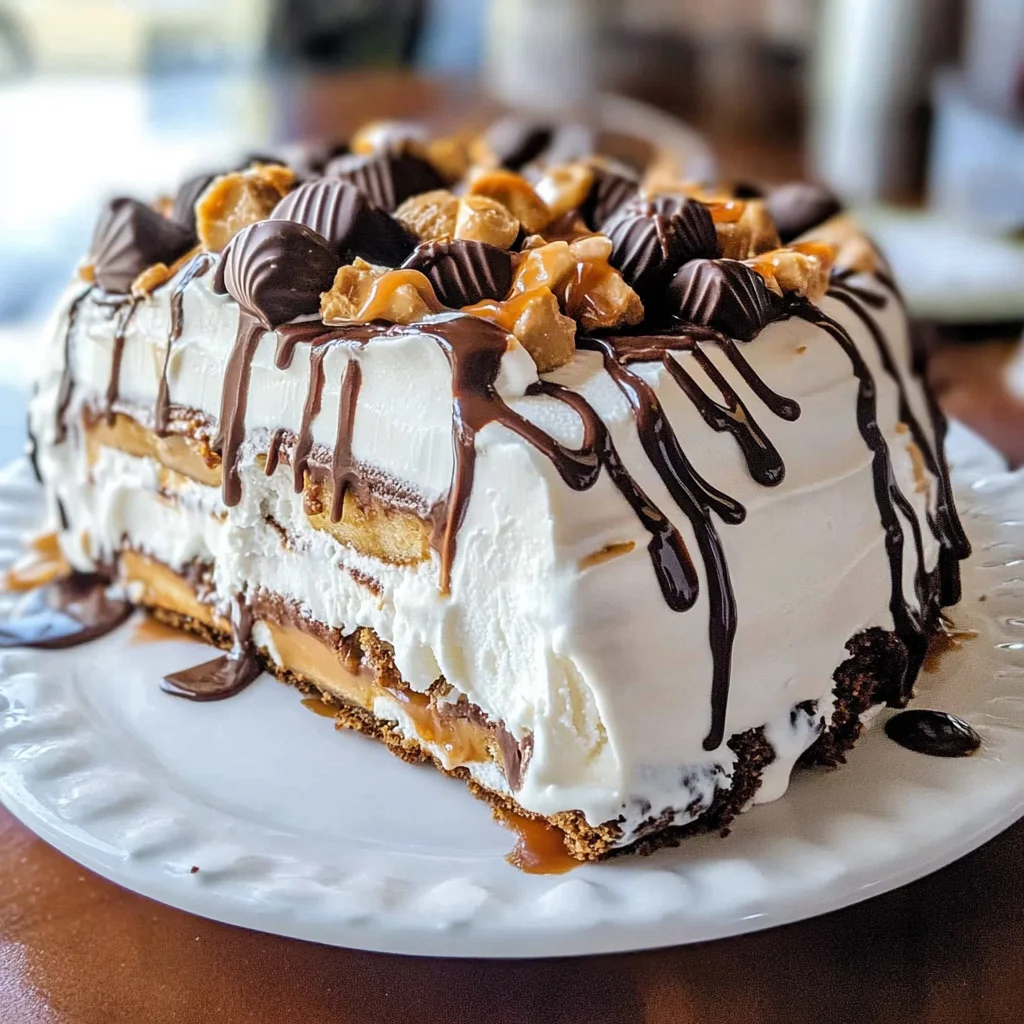
Step 1: Arrange the First Layer
- Place six ice cream sandwiches on a serving platter.
- Drizzle half of the melted peanut butter over the top.
- Add two tablespoons of caramel sauce and hot fudge sauce over this layer.
- Top with one-third of the chopped Reese’s peanut butter cups.
Step 2: Create the Second Layer
- Arrange six more ice cream sandwiches on top of the first layer.
- Drizzle the remaining melted peanut butter over these sandwiches.
- Again, drizzle two tablespoons of each sauce over this layer.
- Add another third of the chopped candies.
Step 3: Final Layer Assembly
- Place the remaining ice cream sandwiches on top to complete the cake.
- Use whipped topping to cover all sides of the cake generously.
Step 4: Drizzle and Top Off
- Drizzle any remaining caramel and hot fudge sauces over the top of the cake.
- Finish by sprinkling with any leftover chopped candies.
Step 5: Freezing Time
Allow your cake to set in the freezer for at least 30 minutes to 4 hours before serving. This will help it hold its shape when sliced!
How to Serve Reese’s Ice Cream Cake
Serving Reese’s Ice Cream Cake can elevate any gathering or celebration. This delightful dessert pairs well with a variety of accompaniments that enhance its rich flavors. Here are some fun serving suggestions.
Pair with Fresh Fruits
- Sliced Bananas: The sweetness of bananas complements the chocolate and peanut butter beautifully.
- Berries: Strawberries, blueberries, or raspberries add a refreshing contrast and a burst of color.
- Pineapple Chunks: For a tropical twist, serve alongside juicy pineapple for a sweet and tangy flavor.
Add Extra Sauces
- Chocolate Sauce: Drizzle warm chocolate sauce over each slice for an indulgent touch.
- Caramel Sauce: A little extra caramel sauce can enhance the cake’s sweetness and richness.
Top with Nuts
- Chopped Peanuts: Sprinkle chopped peanuts on top for added crunch and nutty flavor.
- Pecan Pieces: Use pecans for a buttery taste that pairs nicely with the existing flavors.
Create Mini Servings
- Ice Cream Sandwiches: Cut into smaller pieces or serve in cupcake liners for easy individual servings.
- Dessert Shooters: Layer small portions of the cake in clear cups for a fun presentation at parties.
How to Perfect Reese’s Ice Cream Cake
To achieve the best results when making Reese’s Ice Cream Cake, consider these helpful tips.
- Chill Your Ingredients: Make sure your ice cream sandwiches are frozen solid before assembling; this keeps the cake from becoming too soft.
- Layer Evenly: Spread each layer evenly to ensure balanced flavors throughout the cake.
- Use Quality Toppings: Opt for high-quality peanut butter cups and sauces to enhance flavor and texture.
- Freeze Adequately: Let the cake set in the freezer long enough to firm up; this makes slicing much easier.
- Decorate Creatively: Feel free to get creative with decorations using whipped topping, candies, or sprinkles to make it visually appealing.
Best Side Dishes for Reese’s Ice Cream Cake
Pairing side dishes with Reese’s Ice Cream Cake can create a more enjoyable dining experience. Here are some excellent options to consider.
- Vanilla Ice Cream
A classic choice that pairs perfectly with chocolate and peanut butter flavors. - Fruit Salad
A light and refreshing option that balances out the richness of the cake. - Chocolate Chip Cookies
For cookie lovers, serving warm cookies alongside adds an extra treat. - Brownie Bites
These fudgy bites complement the ice cream cake’s texture and flavor profile. - Nutty Granola Bars
Adding granola bars offers some crunch and healthy elements to your dessert spread. - Milkshakes
Chocolate or peanut butter milkshakes can be a fun drink pairing with this decadent dessert.
Common Mistakes to Avoid
There are a few common pitfalls when making Reese’s Ice Cream Cake that can affect the final result. Here are some mistakes to watch out for:
- Not using enough layers: Skipping layers can make your cake feel flat. Ensure you alternate layers of ice cream sandwiches and toppings for depth.
- Overheating the peanut butter: If you heat the peanut butter too much, it can become too thin and runny. Heat just until melted for the best consistency.
- Skipping the freezer time: If you don’t let your cake set in the freezer long enough, it may fall apart when sliced. Aim for at least 30 minutes, but 4 hours is ideal.
- Ignoring texture balance: Focusing solely on sweet flavors can make your cake overly rich. Balance with some salty or crunchy elements, like crushed nuts or pretzels.
- Using warm whipped topping: If the whipped topping isn’t cold, it won’t hold its shape well. Make sure it’s chilled before applying it around the cake.
Storage & Reheating Instructions
Refrigerator Storage
- Store leftover cake in an airtight container.
- It will last up to 3 days in the refrigerator.
Freezing Reese’s Ice Cream Cake
- For longer storage, freeze slices individually wrapped in plastic wrap.
- They can be frozen for up to 2 months.
Reheating Reese’s Ice Cream Cake
- Oven: Not recommended as this is a frozen dessert best served chilled.
- Microwave: Use sparingly if you want to soften a slice slightly; microwave on low power for just a few seconds.
- Stovetop: Not applicable; this dessert should remain frozen until ready to serve.
Frequently Asked Questions
What is Reese’s Ice Cream Cake?
Reese’s Ice Cream Cake is a delicious dessert that combines chocolate and peanut butter flavors using ice cream sandwiches and toppings for a delightful treat.
Can I customize my Reese’s Ice Cream Cake?
Absolutely! You can add different toppings such as crushed cookies, nuts, or other candies to create your perfect version of Reese’s Ice Cream Cake.
How long does it take to prepare Reese’s Ice Cream Cake?
The total time from preparation to serving of Reese’s Ice Cream Cake is about 3 hours and 20 minutes, including freezing time.
Is Reese’s Ice Cream Cake suitable for kids?
Yes! This dessert is fun and appealing to children due to its sweet flavors and playful presentation.
Can I make this cake ahead of time?
Definitely! You can prepare Reese’s Ice Cream Cake a day in advance and store it in the freezer until you’re ready to serve.
Final Thoughts
Reese’s Ice Cream Cake is not only delicious but also versatile. Its combination of chocolate and peanut butter makes it irresistible. Feel free to customize it with your favorite toppings or adjust serving sizes as needed. Give this recipe a try for your next gathering!
Reese’s Ice Cream Cake

Indulge in the delicious layers of Reese’s Ice Cream Cake, where rich chocolate meets creamy peanut butter in a delightful no-bake dessert. This cake is a crowd-pleaser, perfect for birthdays, summer gatherings, or any occasion that calls for a sweet treat. With its simple assembly of ice cream sandwiches, melted peanut butter, and decadent sauces, this cake is both easy to make and utterly satisfying. Customize it with your favorite toppings for an extra special touch. Dive into this frozen delight that’s sure to impress!
- Prep Time: 20 minutes
- Cook Time: None
- Total Time: 0 hours
- Yield: Serves approximately 12 people 1x
- Category: Dessert
- Method: No-bake
- Cuisine: American
Ingredients
- 18 vanilla ice cream sandwiches
- 1 cup peanut butter, melted
- 6 tablespoons caramel sauce
- 6 tablespoons hot fudge sauce
- 2 8 oz containers whipped topping
- 1 package of peanut butter cups (12 total)
Instructions
- Arrange six ice cream sandwiches on a serving platter.
- Drizzle half of the melted peanut butter over the sandwiches, then add two tablespoons each of caramel and hot fudge sauce.
- Sprinkle one-third of the chopped peanut butter cups on top.
- Repeat the layering process with six more ice cream sandwiches, melted peanut butter, sauces, and another third of the chopped candies.
- Finish with the last layer of ice cream sandwiches and cover generously with whipped topping.
- Drizzle remaining sauces over the top and freeze for at least 30 minutes before serving.
Nutrition
- Serving Size: 1 slice (109g)
- Calories: 297
- Sugar: 18g
- Sodium: 150mg
- Fat: 15g
- Saturated Fat: 5g
- Unsaturated Fat: 9g
- Trans Fat: 0g
- Carbohydrates: 36g
- Fiber: 2g
- Protein: 6g
- Cholesterol: 0mg


Leave a Comment