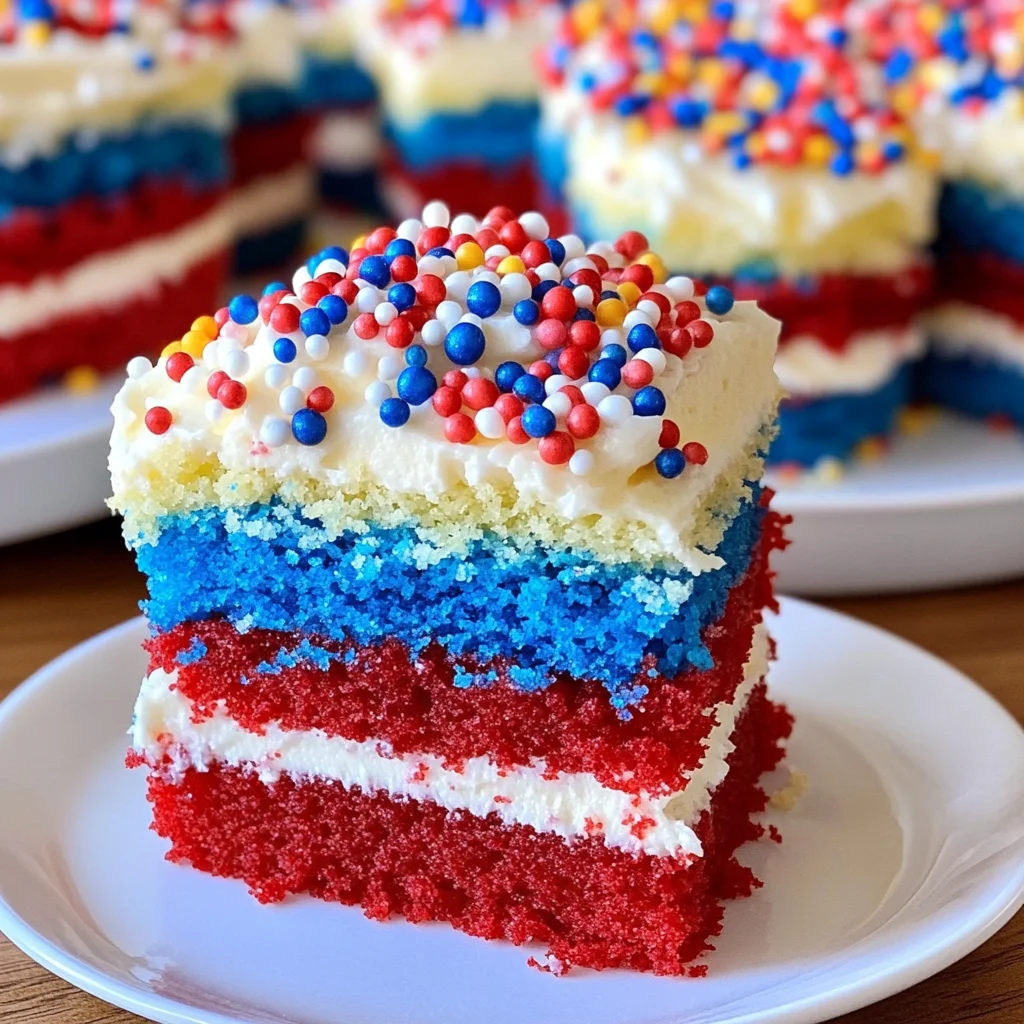
These Red, White, and Blue Mini Cakes are a delightful treat that brightens up any summer gathering or BBQ. Their vibrant colors and fun presentation make them perfect for celebrations like Independence Day or Memorial Day. These mini cakes not only look festive but are also easy to prepare, ensuring you can spend more time enjoying the festivities with friends and family.
Why You’ll Love This Recipe
- Quick preparation: With a total time of just 55 minutes, these mini cakes are simple to whip up for any occasion.
- Festive appeal: The striking red, white, and blue colors create an eye-catching dessert that’s sure to impress your guests.
- Customizable layers: You can easily adjust the flavors or colors to suit your preferences, making them versatile for various holidays.
- Perfect portioning: Each mini cake is just the right size for individual servings, minimizing mess and maximizing enjoyment.
- Fun for kids: Involve the little ones in decorating these cakes—it’s a fun activity that doubles as quality family time.
Tools and Preparation
Before you dive into making these delicious mini cakes, gather the necessary tools. Having everything ready ensures a smooth baking experience.
Essential Tools and Equipment
- nonstick spray
- 9-inch cake pans (3)
- mixing bowls (3)
- whisk or electric mixer
- spatula
- wire rack
- 2.5-inch circle cutter
Importance of Each Tool
- Nonstick Spray: Prevents the cake from sticking to the pan, making it easier to remove once baked.
- Mixing Bowls: Essential for separating and coloring the batter without mess.
- Wire Rack: Allows cakes to cool evenly, preventing sogginess on the bottom.
Ingredients
These Red, White, and Blue Mini Cakes require a few simple ingredients:
For the Cake Layers
- nonstick spray
- flour
- 1 box vanilla cake mix (plus ingredients to prepare mix: eggs, oil, etc.)
- red and blue food coloring
For Frosting and Decoration
- 2 containers vanilla or white frosting
- red, white, and blue sprinkles
How to Make Red, White, and Blue Mini Cakes
Step 1: Preheat the Oven
Preheat your oven to 350 degrees Fahrenheit. This ensures it reaches the right temperature for baking.
Step 2: Prepare Cake Pans
Spray three 9-inch cake pans with nonstick spray. After spraying, lightly coat each pan with flour to prevent sticking.
Step 3: Prepare Cake Mix
Prepare the vanilla cake mix according to package directions. For a whiter cake layer, use egg whites instead of whole eggs.
Step 4: Divide and Color Batter
Measure the batter into three separate bowls.
1. Leave one bowl plain (this will be your white layer).
2. Add red food coloring to one bowl until you achieve your desired shade.
3. Do the same with blue food coloring in another bowl.
Step 5: Bake Cake Layers
Pour each colored batter into its prepared cake pan.
Bake in preheated oven until a toothpick inserted in the center comes out clean—this should take about 10 to 12 minutes.
Step 6: Cool Cakes
Once baked, let each cake cool slightly before removing them from their pans. Transfer them onto a wire rack to cool completely before frosting.
Step 7: Cut Out Circles
Using a 2.5-inch circle cutter, cut each cooled layer into seven circles. If any layers have domed tops after baking, slice them off with a serrated knife before cutting.
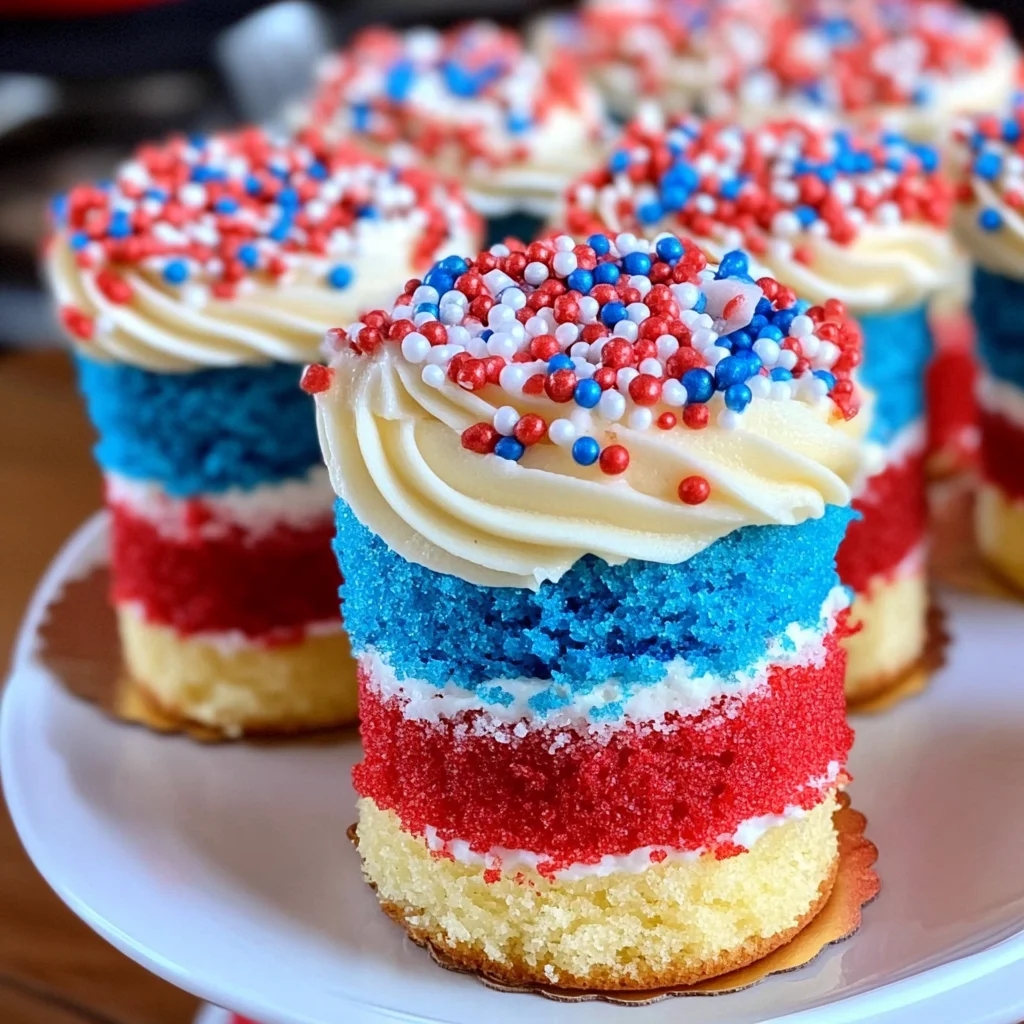
Step 8: Assemble Mini Cakes
Begin by covering one blue cake circle generously with frosting.
1. Place a white circle on top of the frosted blue circle.
2. Add more frosting on top of this layer before finishing with a red circle.
3. Top this final layer with additional frosting.
Step 9: Finish Decoratively
Use a flat knife side to smooth out excess frosting along the sides of each assembled mini cake.
Step 10: Repeat Assembly Process
Repeat steps for all remaining circles until all mini cakes are assembled.
Step 11: Add Sprinkles
Top each mini cake with red, white, and blue sprinkles for an extra festive touch.
Step 12: Serve or Store
Enjoy these delightful cakes right away or store them in a cool place until you’re ready to serve!
How to Serve Red, White, and Blue Mini Cakes
These delightful Red, White, and Blue Mini Cakes make an eye-catching addition to any summer gathering. Here are some fun serving suggestions to enhance your presentation and flavor.
Individual Treats
- Serve each mini cake on a small plate for a personal touch that guests will love.
Cake Stacks
- Create a fun dessert table by stacking mini cakes on different heights of stands. This adds visual interest!
Party Platters
- Arrange several mini cakes on a large platter with fresh berries around them for added color and freshness.
Ice Cream Pairings
- Offer a scoop of vanilla or berry ice cream alongside the mini cakes for a refreshing contrast.
Themed Decorations
- Decorate your serving area with red, white, and blue themed tableware to complement the cakes and enhance the festive atmosphere.
Fun Toppers
- Add small flags or decorative picks to each mini cake for an extra festive touch that celebrates summer occasions.
How to Perfect Red, White, and Blue Mini Cakes
To ensure your Red, White, and Blue Mini Cakes turn out perfectly every time, keep these tips in mind.
- Choose Quality Ingredients: Use fresh eggs and high-quality frosting for the best flavor.
- Measure Carefully: Accurate measurements will help achieve the right batter consistency and texture.
- Monitor Baking Time: Keep an eye on your cakes as they bake; they can go from perfect to overdone quickly.
- Cool Completely: Allow the cakes to cool fully before frosting to prevent melting and messiness.
- Use Sharp Cutters: A sharp circle cutter will give you clean edges when cutting out the mini cakes.
- Layer Thoughtfully: When stacking layers, ensure even distribution of frosting for stability and aesthetic appeal.
Best Side Dishes for Red, White, and Blue Mini Cakes
Pairing these delightful mini cakes with the right side dishes can elevate your dessert experience. Here are some great options.
- Fresh Fruit Salad: A colorful mix of seasonal fruits that brings brightness and freshness to your meal.
- Vanilla Whipped Cream: Lightly sweetened whipped cream serves as a delightful topping or side dip for the mini cakes.
- Berry Compote: A homemade compote made from strawberries or blueberries adds a tangy contrast to the sweetness of the cakes.
- Nutty Granola: Sprinkle some nutty granola on top or serve it on the side for added crunch and flavor complexity.
- Mini Cheesecakes: Offer bite-sized cheesecakes as another sweet option that pairs well with fruity flavors.
- Chocolate-Dipped Strawberries: These elegant treats add richness while complementing the cake’s festive colors.
Common Mistakes to Avoid
Baking can be tricky, especially with mini cakes. Here are common mistakes to steer clear of while preparing your Red, White, and Blue Mini Cakes.
- Skipping the Nonstick Spray: Not using nonstick spray can cause your cakes to stick to the pans. Always spray and flour your pans for easy removal.
- Overmixing the Batter: Overmixing can lead to dense cakes. Mix just until combined for a light and fluffy texture.
- Ignoring Cake Cooling Time: Cutting into warm cakes can result in crumbling. Allow your layers to cool completely before frosting.
- Using Whole Eggs Instead of Egg Whites: For a lighter color, use only egg whites when making white cake layers. This ensures they stay bright and vibrant.
- Not Measuring Batter Evenly: Uneven batter distribution results in uneven cake layers. Use a scale or measuring cups for accuracy.
Storage & Reheating Instructions
Refrigerator Storage
- Store mini cakes in an airtight container.
- They will last up to 3 days in the refrigerator.
Freezing Red, White, and Blue Mini Cakes
- Wrap each mini cake tightly in plastic wrap before placing them in a freezer-safe container.
- They can be frozen for up to 3 months.
Reheating Red, White, and Blue Mini Cakes
- Oven: Preheat to 350°F (175°C). Wrap cakes in aluminum foil and heat for about 10-15 minutes.
- Microwave: Place on a microwave-safe plate. Heat for 10-15 seconds at a time until warmed through.
- Stovetop: Use a skillet over low heat with a lid. Heat for about 5 minutes or until warmed.
Frequently Asked Questions
Here are some commonly asked questions about making Red, White, and Blue Mini Cakes.
How do I achieve vibrant colors for my cakes?
To get bold colors, use gel food coloring instead of liquid. Gel colors provide more intensity without affecting the batter’s consistency.
Can I substitute other flavors in this recipe?
Yes! You can experiment with different cake mixes like chocolate or lemon. Just ensure the frosting complements your flavor choice.
How do I decorate my Red, White, and Blue Mini Cakes?
You can use fresh fruits or edible flowers along with sprinkles for decoration. Get creative with toppings that fit the patriotic theme!
What occasions are these mini cakes suitable for?
These Red, White, and Blue Mini Cakes are perfect for summer parties, BBQs, Memorial Day celebrations, and Fourth of July festivities.
Final Thoughts
These Red, White, and Blue Mini Cakes are not only festive but also versatile. Customize them with different flavors or decorations to suit any occasion. Give this recipe a try at your next gathering; it’s sure to impress!
Red, White, and Blue Mini Cakes
Experience the joy of summer celebrations with these delightful Red, White, and Blue Mini Cakes! Perfectly portioned for individual servings, these vibrant treats are not only visually stunning but also a breeze to prepare, allowing you to focus on spending time with loved ones. Each mini cake features layers of colorful vanilla cake—red, white, and blue—frosted to perfection and adorned with festive sprinkles. Whether it’s a backyard BBQ or a holiday gathering, these charming desserts are sure to impress your guests and add a touch of fun to any occasion.
- Prep Time: 20 minutes
- Cook Time: 15 minutes
- Total Time: 35 minutes
- Yield: Approximately 12 mini cakes 1x
- Category: Dessert
- Method: Baking
- Cuisine: American
Ingredients
- nonstick spray
- flour
- 1 box vanilla cake mix (plus ingredients to prepare mix: eggs, oil, etc.)
- red and blue food coloring
- 2 containers vanilla or white frosting
- red, white, and blue sprinkles
Instructions
- Preheat oven to 350°F (175°C).
- Spray three 9-inch cake pans with nonstick spray and lightly coat with flour.
- Prepare the vanilla cake mix according to package directions.
- Divide batter into three bowls: leave one plain for the white layer; color one red and one blue.
- Bake each layer for 10-12 minutes until a toothpick comes out clean. Cool completely on wire racks.
- Cut each cooled layer into 2.5-inch circles using a circle cutter.
- Assemble by stacking layers (blue, white, red) with frosting between each.
- Frost the top and sides and decorate with sprinkles.
Nutrition
- Serving Size: 1 mini cake (45g)
- Calories: 160
- Sugar: 14g
- Sodium: 180mg
- Fat: 6g
- Saturated Fat: 2g
- Unsaturated Fat: 4g
- Trans Fat: 0g
- Carbohydrates: 24g
- Fiber: 0g
- Protein: 2g
- Cholesterol: 15mg
Leave a Comment