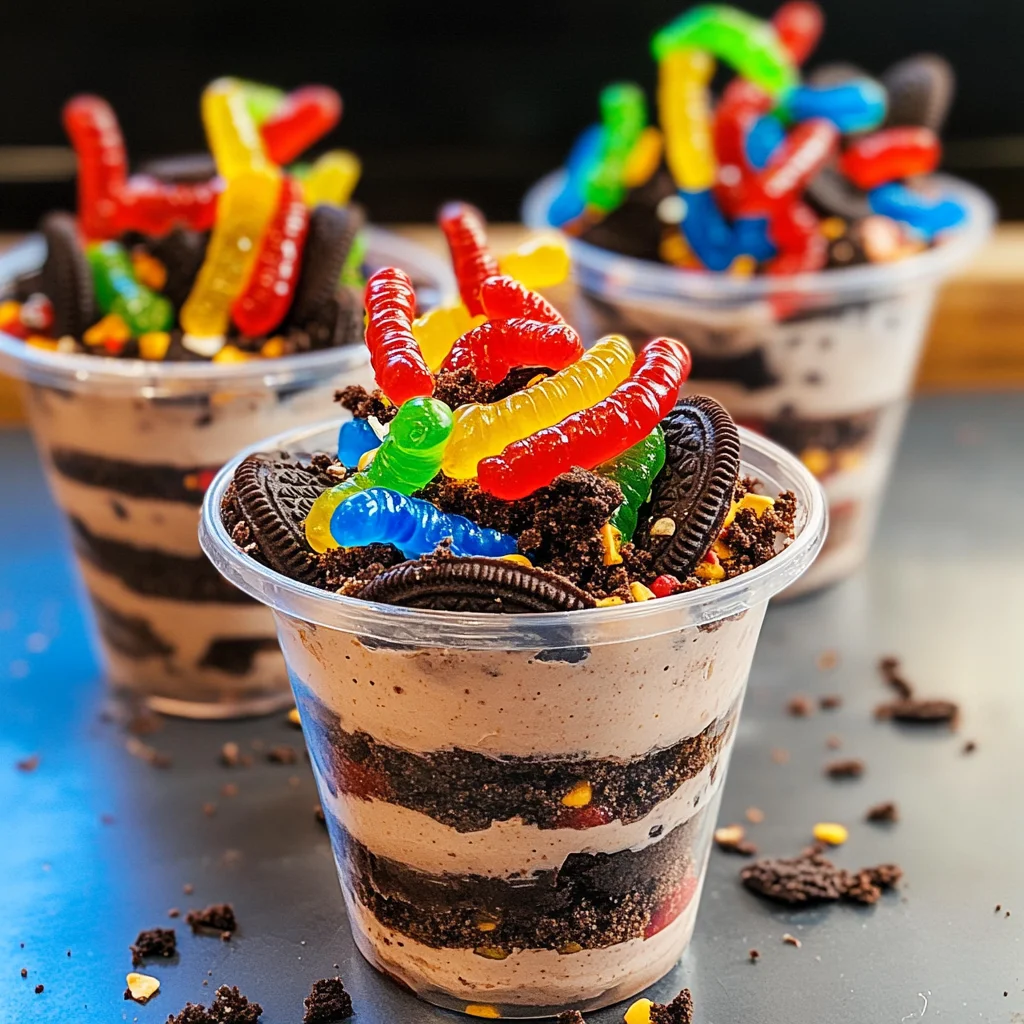
Dirt and Worms Pudding Cups are a fun and delicious treat for kids of all ages! These individual dessert cups combine creamy chocolate pudding, crunchy Oreo cookies, and pectin-based gummy candies to create a playful twist on a classic dessert. Perfect for birthday parties or just a fun snack, they add excitement to any occasion with their whimsical presentation and delightful flavors.
Why You’ll Love This Recipe
- Easy to Make: This recipe requires only a few simple steps, making it perfect for busy parents or beginner cooks.
- Kid-Friendly Fun: Kids love the playful combination of chocolate pudding and gummy candies, making this dessert a hit at any gathering.
- Versatile Presentation: Serve in individual cups or layer the ingredients for an impressive display that looks great on any table.
- Quick Prep Time: With just 10 minutes of prep time, you can whip up these delightful treats in no time.
- Customizable Ingredients: Feel free to adjust the toppings or use different flavored pudding mixes to suit your taste!
Tools and Preparation
To make Dirt and Worms Pudding Cups, you’ll need a few essential tools. Having the right equipment ensures your dessert comes out perfectly every time.
Essential Tools and Equipment
- Mixing bowl
- Whisk
- Measuring cups
- Plastic serving cups
- Refrigerator
Importance of Each Tool
- Mixing Bowl: A large mixing bowl allows you to easily whisk together the pudding mix and milk without worrying about spills.
- Whisk: Using a whisk helps achieve a smooth pudding texture by breaking up lumps quickly.
- Measuring Cups: Accurate measurements ensure that your pudding turns out just right; too much or too little can affect consistency.
Ingredients
For the Pudding Layer
- 1 (3.4 ounce) chocolate pudding mix
- 2 cups cold milk
For the Topping
- 1 (8 ounce) tub Cool Whip
- 20 Oreo cookies, finely crushed
For the Worms
- 24 – 32 pectin-based gummy candies
For Serving
- 8 plastic cups
How to Make Dirt and Worms Pudding Cups
Step 1: Prepare the Pudding
- Whisk together chocolate pudding mix and cold milk in a large mixing bowl until well combined and no lumps remain.
- Chill mixture in the refrigerator for 5 minutes to thicken up.
Step 2: Add Cool Whip
- Fold the Cool Whip into the pudding until just combined. Be gentle to keep it light and fluffy.
Step 3: Assemble Your Cups
- Divide the pudding between your 8 serving cups.
- Top each cup with crushed Oreo cookies. You can also layer the pudding and crushed Oreos for an appealing look!
Step 4: Garnish with Gummy Worms
- Chill in the refrigerator until ready to serve.
- Just before serving, garnish the top of each cup with 3-4 pectin-based gummy candies, creating your worms in dirt effect.
Enjoy your delightful Dirt and Worms Pudding Cups!
How to Serve Dirt and Worms Pudding Cups
Dirt and Worms Pudding Cups are a delightful dessert that can be presented in various fun ways. These creative serving suggestions will elevate your dessert experience, making it even more enjoyable for everyone.
For Birthday Parties
- Use brightly colored plastic cups to match the party theme. This adds an extra layer of excitement for kids.
- Decorate the cups with stickers or themed decorations to make them visually appealing.
As a Fun Snack
- Serve them in clear cups to show off the layers of pudding and crushed Oreos. Kids love seeing the dirt and worms.
- Pair with a side of fruit skewers for a refreshing contrast to the rich dessert.
During Movie Nights
- Create a DIY dessert bar where kids can add their own gummy worms on top of their pudding cups.
- Provide small spoons for easy scooping, making it mess-free during movie time.
At Family Gatherings
- Make a large batch and serve them in a big bowl for family-style sharing. Guests can help themselves as they mingle.
- Offer whipped cream on the side for those who may want an extra creamy touch.
How to Perfect Dirt and Worms Pudding Cups
Creating the perfect Dirt and Worms Pudding Cups is all about attention to detail. Here are some tips to ensure your dessert turns out amazing every time.
- Chill your ingredients: Make sure your milk and Cool Whip are cold before mixing. This helps create a smooth, creamy texture.
- Mix thoroughly: Whisk the pudding mix and milk until fully combined, ensuring there are no lumps for a velvety finish.
- Layer creatively: For an eye-catching presentation, alternate layers of pudding and crushed Oreos rather than just topping it off.
- Garnish generously: Add 3-4 gummy candies per cup on top for that classic worm effect that kids adore.
- Keep it cool: Chill the finished cups in the refrigerator until serving to keep everything fresh and tasty.
Best Side Dishes for Dirt and Worms Pudding Cups
To complement your Dirt and Worms Pudding Cups, consider these delightful side dishes that enhance the overall dessert experience.
- Fruit Skewers: Colorful pieces of fruit threaded onto skewers provide a healthy balance to the sweet pudding cups.
- Mini Sandwiches: Small sandwiches with various fillings offer savory options that contrast nicely with the sweetness of dessert.
- Veggie Sticks with Dip: Crunchy carrots, celery, and bell peppers served with hummus or ranch dressing add freshness.
- Cheese Cubes: A platter of assorted cheese cubes offers a savory bite that pairs well with sweet treats.
- Popcorn: Lightly salted popcorn adds crunch and is easy for guests to munch on between bites of pudding.
- Rice Krispie Treats: These chewy, marshmallow-based snacks provide another fun texture alongside your pudding cups.
Common Mistakes to Avoid
When making Dirt and Worms Pudding Cups, it’s easy to make some common errors. Here are a few pitfalls to watch out for:
- Incorrect Mixing: Failing to whisk the pudding mix and milk thoroughly can lead to lumps. Always ensure the mixture is smooth before chilling.
- Overfolding Cool Whip: If you overmix the Cool Whip with pudding, it can become runny. Gently fold until just combined for the best texture.
- Skipping Chill Time: Not allowing the pudding to chill properly can result in a thin consistency. Make sure to chill for at least 5 minutes.
- Using Non-pectin Candies: Using regular gummy candies instead of pectin-based ones will not yield the same results. Always check the ingredients for pectin.
- Not Layering: Simply topping with crushed Oreos misses out on a fun presentation. Consider layering for a more visually appealing cup.

Storage & Reheating Instructions
Refrigerator Storage
- Store in airtight containers for up to 3 days.
- Keep individual cups covered with plastic wrap or lids.
Freezing Dirt and Worms Pudding Cups
- It is not recommended to freeze pudding cups as it may alter the texture.
- If you must freeze, use freezer-safe containers and consume within one month.
Reheating Dirt and Worms Pudding Cups
- Oven: Not recommended; pudding should be enjoyed chilled.
- Microwave: Use cautiously; heat in short intervals if necessary but avoid heating if possible.
- Stovetop: Not recommended; serve chilled directly from the refrigerator.
Frequently Asked Questions
Here are some common questions about Dirt and Worms Pudding Cups that may help clarify any concerns.
Can I use different flavors of pudding?
Yes! You can experiment with various flavors like vanilla or butterscotch for unique twists on Dirt and Worms Pudding Cups.
How long do they last in the fridge?
Dirt and Worms Pudding Cups will remain fresh in the refrigerator for about 3 days when stored properly.
Can I customize the gummy worms?
Absolutely! Feel free to choose different shapes or colors of pectin-based gummy candies to suit your theme or preference.
What if I don’t have Cool Whip?
You can make homemade whipped cream as a substitute or use any other non-dairy whipped topping as an alternative in your Dirt and Worms Pudding Cups.
Final Thoughts
Dirt and Worms Pudding Cups are a delightful treat that appeals to kids and adults alike. Their fun appearance makes them perfect for parties or just as an everyday dessert. You can easily customize them by changing flavors or toppings, so feel free to get creative!
Dirt and Worms Pudding Cups

Dirt and Worms Pudding Cups are a delightful and whimsical treat that kids will love! This fun dessert combines creamy chocolate pudding, crunchy Oreo cookies, and playful pectin-based gummy candies to create a deliciously messy experience. Perfect for birthday parties or as an everyday snack, these pudding cups are not only visually appealing but also easy to make, providing a fantastic way to engage children in the kitchen. With just a few simple ingredients and quick preparation steps, you can whip up this treat in no time. Get ready for some sweet fun!
- Prep Time: 10 minutes
- Cook Time: None
- Total Time: 0 hours
- Yield: Serves 8
- Category: Dessert
- Method: No-Bake
- Cuisine: American
Ingredients
- 1 (3.4 ounce) chocolate pudding mix
- 2 cups cold milk
- 1 (8 ounce) tub Cool Whip
- 20 Oreo cookies, finely crushed
- 24 – 32 pectin-based gummy candies
- 8 plastic cups
Instructions
- Whisk the chocolate pudding mix with cold milk in a large mixing bowl until smooth. Chill for 5 minutes.
- Gently fold the Cool Whip into the pudding until just combined.
- Divide the pudding among the plastic cups and top with crushed Oreos. For an attractive look, layer the pudding and Oreos.
- Garnish each cup with 3-4 pectin-based gummy candies before serving.
Nutrition
- Serving Size: 1 cup (180g)
- Calories: 290
- Sugar: 28g
- Sodium: 105mg
- Fat: 12g
- Saturated Fat: 6g
- Unsaturated Fat: 6g
- Trans Fat: 0g
- Carbohydrates: 44g
- Fiber: 1g
- Protein: 3g
- Cholesterol: 5mg
Leave a Comment