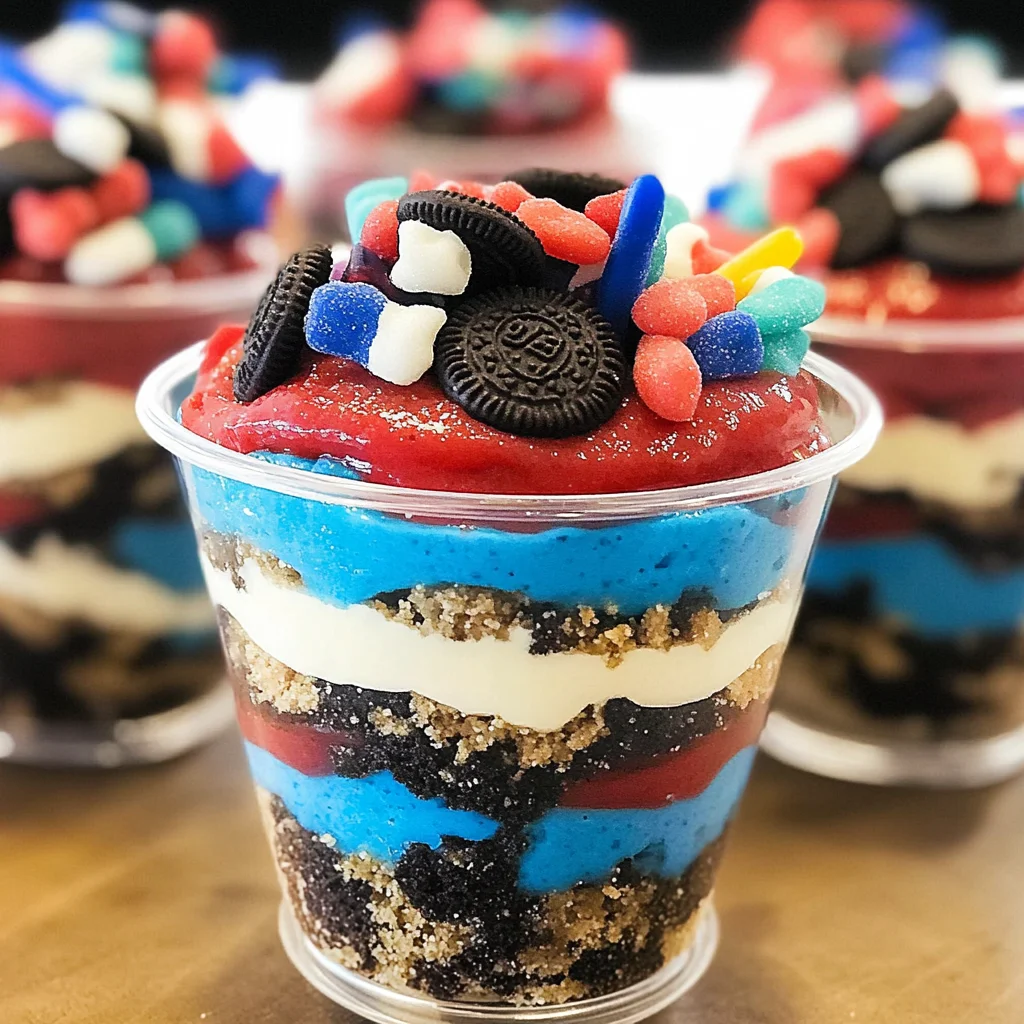
Easy no-bake Red, White and Blue Dirt Cups are a delightful treat that can brighten up any occasion. Perfect for summer gatherings or festive celebrations, these layered desserts combine the crunch of Oreos with creamy pudding and colorful gummy candies. Their vibrant appearance and fun flavors make them a favorite among kids and adults alike.
Why You’ll Love This Recipe
- Quick to Prepare: With just 10 minutes of prep time, you can create these delicious cups without turning on the oven.
- Kid-Friendly Fun: Kids will love helping to layer the ingredients and decorate their own cups with gummy candies.
- Versatile Dessert: Perfect for the 4th of July, birthday parties, or any festive event where you want to impress guests with minimal effort.
- No-Bake Convenience: This recipe is ideal for warm summer days when you want a cool dessert without heating up the kitchen.
- Colorful Presentation: The red, white, and blue layers create a visually stunning dessert that fits perfectly into any patriotic theme.
Tools and Preparation
Before diving into this delicious recipe, gather your tools to ensure a smooth preparation process.
Essential Tools and Equipment
- Mixing bowls
- Whisk
- Plastic cups
- Measuring spoons
Importance of Each Tool
- Mixing bowls: Essential for combining pudding and milk, allowing for easy whisking and mixing of colors.
- Whisk: A must-have tool for achieving a smooth pudding texture without lumps.
- Plastic cups: Ideal for serving individual portions while showcasing the beautiful layers of your dessert.
Ingredients
To make these colorful Red, White and Blue Dirt Cups, gather the following ingredients:
For the Pudding Layers
- 2 boxes cheesecake pudding (3.4 ounces each)
- 4 cups milk
For the Oreo Layer
- 19 Oreo cookies (crushed)
For Coloring
- ¼ teaspoon red gel food dye
- ¼ teaspoon blue gel food dye
For Toppings
- 8 red and blue pectin-based gummy candies
How to Make Red, White and Blue Dirt Cups
Step 1: Prepare the Pudding Mixture
- Place both boxes of pudding in a large mixing bowl.
- Add 4 cups of milk to the bowl.
- Whisk until the pudding has thickened.
Step 2: Color Your Pudding Layers
- Divide the thickened pudding into two separate bowls:
- Place 1 cup of pudding in one bowl.
- Place 1 ½ cups of pudding in another bowl.
- In the first bowl (1 cup), add the blue gel dye and mix until fully incorporated.
- In the second bowl (1 ½ cups), add red gel dye and stir until thoroughly mixed.
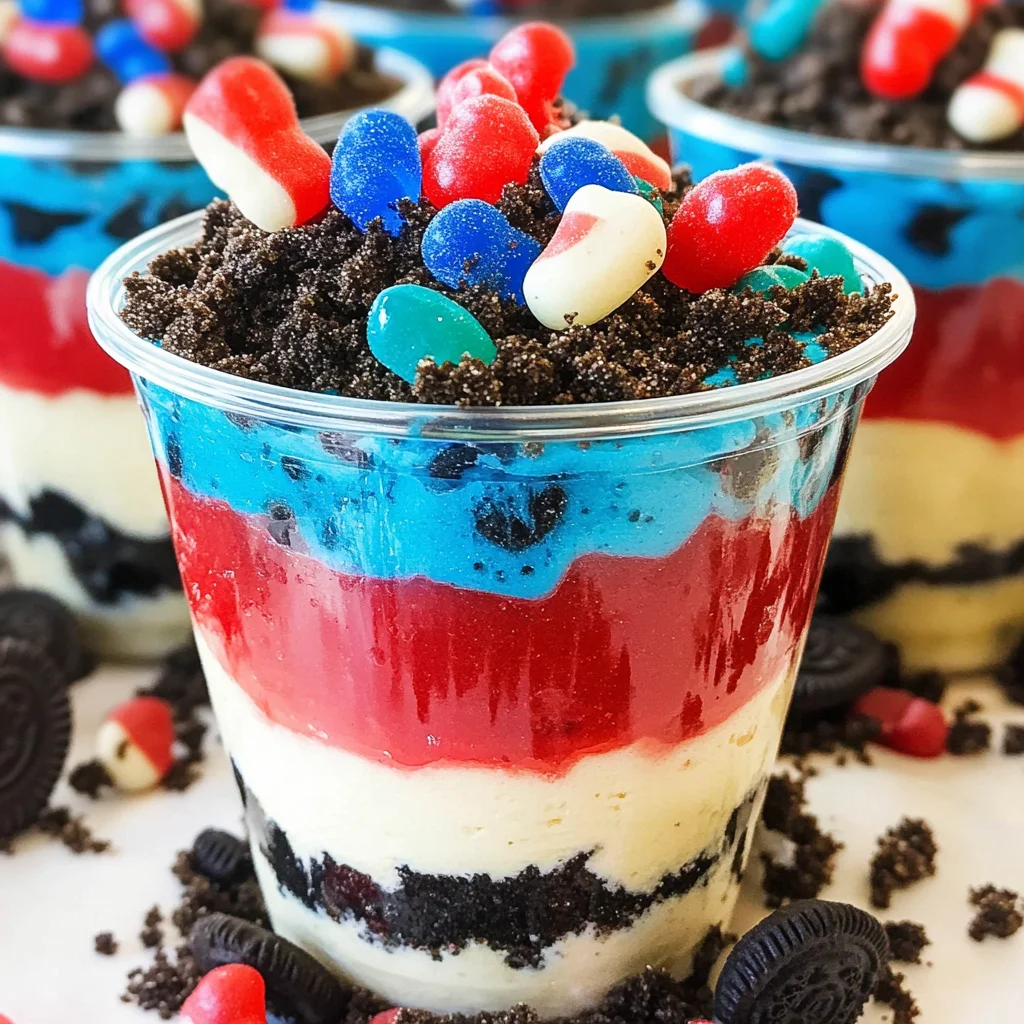
Step 3: Assemble Your Dirt Cups
- Line up your plastic cups for assembly.
- Start with 1 tablespoon of crushed Oreos at the bottom of each cup, spreading it evenly.
- Add 2 tablespoons of blue pudding on top of the Oreos gently spreading it out.
- Follow with another tablespoon of crushed Oreos spread evenly on top.
- Next, add 3 tablespoons of white pudding as your next layer; spread evenly once more.
- Add an additional 1 ½ tablespoons of white pudding; spread it out evenly across this layer.
- Finish with 4 tablespoons of red pudding as your final layer in each cup.
- Top off each cup with another 2 tablespoons of crushed Oreos for added crunch.
- Decorate with two pectin-based gummy candies on top along with one flag per cup.
Now your delightful Red, White and Blue Dirt Cups are ready to be enjoyed!
How to Serve Red, White and Blue Dirt Cups
These delightful Red, White and Blue Dirt Cups are not only visually appealing but also incredibly fun to serve at any gathering. Here are some creative serving suggestions that will impress your guests and enhance their dessert experience.
Individual Cups
- Serve each dirt cup in its own clear plastic cup for a fun and festive presentation. This allows guests to see the beautiful layers of color.
Garnish with Fresh Berries
- Top each dirt cup with fresh strawberries or blueberries for an extra burst of flavor. This adds a refreshing touch while keeping with the patriotic theme.
Mini Flags as Decorations
- Insert mini flags into each dirt cup to elevate your 4th of July celebration. These can be found at party supply stores, making them an easy addition.
Group Dessert Table
- Arrange the dirt cups on a dessert table alongside other themed treats. This creates a stunning visual display that draws guests in.
Family Style Serving
- For a more casual approach, consider layering all ingredients in a large trifle dish. Guests can serve themselves, making it perfect for family gatherings.
How to Perfect Red, White and Blue Dirt Cups
Creating the perfect Red, White and Blue Dirt Cups requires attention to detail. Here are some tips to ensure your dessert turns out beautifully every time.
- Use Cold Milk: Make sure your milk is cold before mixing it with pudding. This helps the pudding set quicker and attain the right consistency.
- Crush Oreos Finely: Crush the Oreos into fine crumbs for easier layering. This will create a better texture and allow for more even layers in your cups.
- Chill Before Serving: Let your dirt cups chill in the refrigerator for at least 1 hour before serving. This enhances their flavor and improves the overall texture.
- Layer Neatly: Take your time when layering pudding and Oreos. Clean edges make for an attractive presentation that guests will admire.
- Experiment with Colors: Feel free to adjust the amount of food dye you use to make vibrant layers. Just remember to mix thoroughly for even coloration.
Best Side Dishes for Red, White and Blue Dirt Cups
Pairing side dishes with your Red, White and Blue Dirt Cups can create a well-rounded meal that delights everyone. Here are some great options to consider:
- Patriotic Fruit Salad: Combine red strawberries, white bananas, and blue blueberries for a colorful and refreshing side dish.
- Caprese Skewers: Alternate cherry tomatoes, mozzarella balls, and basil leaves on skewers for a savory option that’s easy to grab.
- Corn on the Cob: Grilled or boiled corn seasoned with butter makes a classic summer side that everyone loves.
- Veggie Platter with Dip: A selection of fresh vegetables served with ranch or hummus provides a crunchy contrast to the sweet dirt cups.
- Potato Salad: Creamy potato salad is a filling side that complements the lightness of dessert well.
- Baked Beans: Sweet baked beans add a hearty touch to your meal while balancing out the sweetness of your dirt cups.
- Pasta Salad: A refreshing pasta salad tossed with veggies can brighten up your table while providing a satisfying bite.
- Grilled Chicken Skewers: Marinated chicken skewers add protein to your gathering while being easy to eat alongside desserts like dirt cups.
Enjoy these serving ideas, tips, and side dishes as you celebrate summer with your delicious Red, White and Blue Dirt Cups!
Common Mistakes to Avoid
Make sure to steer clear of these common mistakes when making your Red, White and Blue Dirt Cups. They can affect the taste and presentation.
- Not measuring ingredients properly: Always use accurate measurements for pudding and Oreo cookies to ensure the right texture and flavor.
- Skipping the chilling time: Allowing the pudding to chill properly helps it set correctly, leading to a better layered appearance.
- Overmixing the food dye: Mix just enough to incorporate the color without overdoing it; this keeps your layers distinct and vibrant.
- Using stale Oreos: Fresh cookies provide a better crunch and flavor. Be sure your Oreos are fresh for optimal taste.
- Ignoring layer assembly: Pay attention to how you layer each component. Proper assembly creates an appealing visual effect.
- Forgetting the garnishes: Don’t skip on decorating! Adding pectin-based gummy candies enhances both flavor and look.
Storage & Reheating Instructions
Refrigerator Storage
- Store in airtight containers for up to 3 days.
- Keep layers intact until ready to serve for best texture.
Freezing Red, White and Blue Dirt Cups
- Freeze in airtight containers for up to 1 month.
- Thaw overnight in the refrigerator before serving.
Reheating Red, White and Blue Dirt Cups
- Oven: Not recommended for this dessert as it may alter texture.
- Microwave: Use only if needed; reheat at low power in short intervals to avoid melting layers.
- Stovetop: Not suitable; best enjoyed chilled or at room temperature.
Frequently Asked Questions
What are Red, White and Blue Dirt Cups?
Red, White and Blue Dirt Cups are a fun no-bake dessert featuring layers of pudding, crushed Oreos, and colorful gummy candies, perfect for summer celebrations.
Can I customize my Red, White and Blue Dirt Cups?
Absolutely! Feel free to swap out colors or add different flavors of pudding or gummies. You can also incorporate fresh fruits for added freshness.
How long do Red, White and Blue Dirt Cups last?
These treats last about 3 days in the refrigerator when stored properly in airtight containers.
Are there any alternatives to Oreo cookies?
Yes! You can use chocolate graham crackers or any chocolate cookies you prefer instead of Oreos for a different taste.
Final Thoughts
Red, White and Blue Dirt Cups are not only visually stunning but also deliciously satisfying. This easy recipe is perfect for summer gatherings or festive celebrations. Feel free to customize it with different flavors or toppings—make it your own!
Red, White and Blue Dirt Cups

Indulge in the festive fun of Red, White and Blue Dirt Cups, a no-bake dessert that’s perfect for summer celebrations. This vibrant treat features luscious layers of cheesecake pudding, crunchy Oreo cookies, and colorful pectin-based gummy candies, making it a hit with both kids and adults alike. With just 10 minutes of prep time, you can create an eye-catching dessert that requires no baking—ideal for those warm days when you want something cool and delightful. Whether you’re hosting a 4th of July gathering or a birthday party, these layered cups are guaranteed to impress your guests while satisfying their sweet cravings.
- Prep Time: 10 minutes
- Cook Time: 0 minutes
- Total Time: 10 minutes
- Yield: Serves 8
- Category: Dessert
- Method: No-bake
- Cuisine: American
Ingredients
- 2 boxes cheesecake pudding (3.4 ounces each)
- 4 cups milk
- 19 Oreo cookies (crushed)
- ¼ teaspoon red gel food dye
- ¼ teaspoon blue gel food dye
- 8 red and blue pectin-based gummy candies
Instructions
- In a large mixing bowl, whisk together both boxes of pudding with cold milk until thickened.
- Divide the pudding into two bowls: mix blue gel dye into one cup and red gel dye into one and mix well.
- Layer crushed Oreos at the bottom of clear plastic cups followed by blue pudding, more Oreos, white pudding, then red pudding.
- Finish with more crushed Oreos on top and garnish with pectin-based gummy candies.
Nutrition
- Serving Size: 1 dirt cup (150g)
- Calories: 290
- Sugar: 22g
- Sodium: 210mg
- Fat: 13g
- Saturated Fat: 7g
- Unsaturated Fat: 6g
- Trans Fat: 0g
- Carbohydrates: 37g
- Fiber: 1g
- Protein: 3g
- Cholesterol: 20mg
Leave a Comment