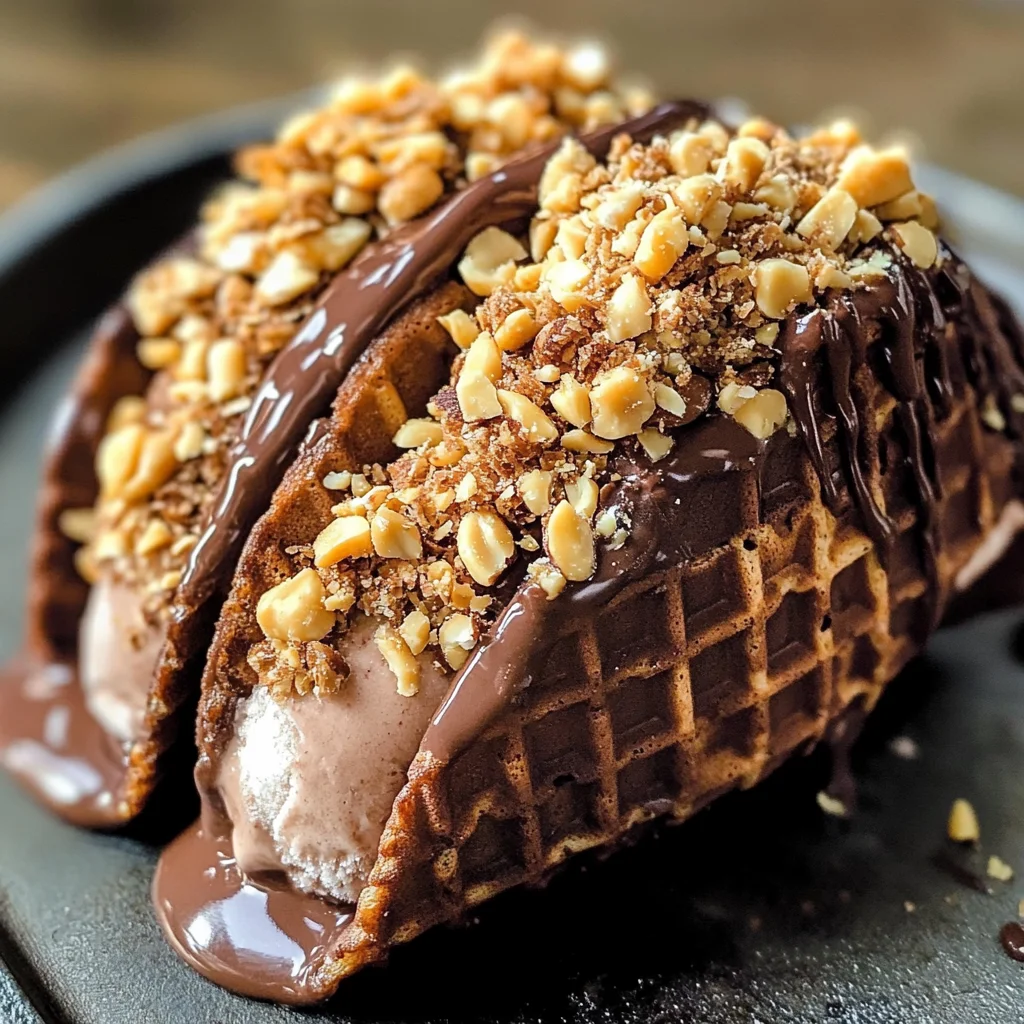
It’s easy to make these Homemade Choco Tacos with a delightful chocolate waffle cone, creamy ice cream, and a crunchy chocolate-peanut coating. This dessert is perfect for summer gatherings or any occasion where you want to impress with a homemade treat. The combination of textures and flavors will surely become a favorite!
Why You’ll Love This Recipe
- Deliciously Unique: These Homemade Choco Tacos offer an exciting twist on traditional ice cream cones, making them a standout dessert.
- Fun to Make: Involving both cooking and assembly, this recipe is a fun activity for family or friends.
- Customizable Flavors: You can choose your favorite ice cream flavor, allowing everyone to enjoy their own unique taco.
- Perfect for Any Occasion: Whether it’s a birthday party, summer barbecue, or just a casual treat, these tacos will be the highlight.
- Crunchy Texture: The combination of crispy waffle cones with creamy ice cream and crunchy peanuts creates a satisfying bite.
Tools and Preparation
Before you dive into making these delicious Homemade Choco Tacos, gather the necessary tools to ensure a smooth process.
Essential Tools and Equipment
- Waffle cone maker
- Mixing bowls
- Whisk or hand mixer
- Ice cream scoop
- Baking rack
Importance of Each Tool
- Waffle cone maker: This specialized tool helps create perfectly shaped waffle cones in just minutes.
- Mixing bowls: Essential for combining ingredients without creating a mess.
- Ice cream scoop: Allows for easy portioning of the softened ice cream into the taco shells.
Ingredients
Here’s what you’ll need to make your own Homemade Choco Tacos:
For the Waffle Cone Shells
- 1 C granulated sugar
- 4 lrg egg whites
- 1 tsp vanilla
- 1/4 tsp salt
- 4 Tbsp butter melted
- 6 Tbsp unsweetened cocoa powder
- 11 Tbsp all-purpose flour
For the Filling and Coating
- 1 gallon Ice cream – any flavor (softened)
- 16 oz Chocolate wafers
- 1 1/2 C Chopped peanuts
How to Make Homemade Choco Taco Tutorial
Step 1: Prepare the Waffle Cone Batter
- In a large mixing bowl, combine all the ingredients for the waffle cone shells until smooth.
- Ensure there are no lumps in the batter for even cooking.
Step 2: Cook the Waffle Cones
- Preheat your waffle cone maker according to its instructions.
- Pipe about 2-3 tablespoons of batter into the machine to form a log shape.
- Cook for approximately 40-45 seconds on medium heat.
- Once cooked, carefully hang each cone on a rack to cool in taco shell form.
Step 3: Fill with Ice Cream
- While the waffle cones cool, soften the ice cream by stirring until it reaches a consistent texture—avoid any hard or runny parts.
- Take one cooled shell and scoop your desired amount of softened ice cream into it.
- Place filled cones back in the freezer to firm up while you work with others.
Step 4: Coat with Chocolate and Peanuts
- Melt the chocolate wafers according to package instructions and allow them to cool slightly.
- Dip the open side of each ice cream-filled taco into the melted chocolate, ensuring all exposed ice cream is covered.
- Immediately dip into chopped peanuts so they stick well.
Step 5: Freeze Until Ready to Serve
- Place finished tacos back in the freezer until you’re ready to serve them.
- Enjoy your delicious Homemade Choco Tacos as a refreshing summer treat!
How to Serve Homemade Choco Taco Tutorial
Homemade Choco Tacos are a delightful treat that can be enjoyed in various ways. Whether you want to impress guests at a summer gathering or simply satisfy your sweet tooth, here are some serving suggestions to elevate your dessert experience.
With Fresh Fruit
- Berries: Serve with a side of fresh strawberries, blueberries, or raspberries for a burst of flavor and color.
- Sliced Bananas: Add sliced bananas on top for extra sweetness and a creamy texture.
Drizzled with Sauces
- Chocolate Sauce: A drizzle of warm chocolate sauce enhances the rich flavors of the taco.
- Caramel Sauce: Pouring caramel sauce adds a sweet touch that pairs well with the chocolate and ice cream.
Topped with Whipped Cream
- Homemade Whipped Cream: Top each Choco Taco with freshly whipped cream to make it even more indulgent.
Served on a Dessert Platter
- Assorted Treats: Arrange your Homemade Choco Tacos alongside brownies and cookies for an impressive dessert platter.
How to Perfect Homemade Choco Taco Tutorial
Perfecting your Homemade Choco Tacos takes practice, but these tips will help you achieve the best results every time.
- Boldly Mix Ingredients: Ensure all ingredients are mixed well until smooth for the best waffle texture.
- Carefully Monitor Cooking Time: Keep an eye on the waffle cone maker to avoid overcooking; each machine varies.
- Quickly Scoop Ice Cream: Work fast when scooping ice cream into the shells to prevent melting.
- Proper Cooling Time: Allow the taco shells to cool completely before adding ice cream for better structure.
- Use Quality Chocolate Wafers: Opt for high-quality chocolate wafers for richer flavor when dipping.
Best Side Dishes for Homemade Choco Taco Tutorial
Pairing side dishes with your Homemade Choco Tacos can enhance the overall dessert experience. Here are some delightful options:
- Fruit Salad: A refreshing mix of seasonal fruits complements the richness of the tacos.
- Vanilla Ice Cream: Serve alongside vanilla ice cream for those who love traditional flavors.
- Chocolate Mousse: A light chocolate mousse adds a creamy contrast to the crunchy tacos.
- Pecan Pie Bars: These bars offer nutty flavors that pair well with chocolate desserts.
- Frozen Yogurt: Light and tangy, frozen yogurt is a great counterbalance to sweet treats.
- Brownies à la Mode: Warm brownies topped with ice cream create a classic dessert combo.
Common Mistakes to Avoid
Making homemade choco tacos can be a fun and rewarding experience. However, there are some common pitfalls to be aware of.
- Bold Preparation: Not preparing all ingredients before starting can lead to confusion. Measure everything out beforehand to keep the process smooth.
- Bold Ice Cream Consistency: Using ice cream that is too hard or too soft makes filling the tacos difficult. Allow the ice cream to soften slightly but not melt.
- Bold Waffle Cone Timing: Overcooking the waffle cones can make them too crispy or burnt. Keep an eye on the timer and check for a light golden color.
- Bold Chocolate Dipping: Not letting the melted chocolate cool slightly can cause it to slide off the ice cream. Allow it to cool for a few minutes before dipping.
- Bold Storage Issues: Stacking warm tacos can lead to sogginess. Ensure they are completely cooled and frozen flat before storing.

Storage & Reheating Instructions
Refrigerator Storage
- Store in an airtight container for up to 3 days.
- Place parchment paper between layers if stacking to avoid sticking.
Freezing Homemade Choco Taco Tutorial
- Freeze for up to 2 months in an airtight container.
- Wrap each taco individually in plastic wrap for best results.
Reheating Homemade Choco Taco Tutorial
- Oven: Preheat to 350°F (175°C) and warm for about 5 minutes until just softened.
- Microwave: Heat on low power for 10-15 seconds; watch closely.
- Stovetop: Place in a non-stick pan over low heat for a few minutes, flipping gently.
Frequently Asked Questions
Here are some common questions about making this delightful dessert.
What is a Homemade Choco Taco Tutorial?
This tutorial guides you through creating delicious homemade choco tacos with chocolate waffle cones filled with ice cream, dipped in chocolate.
Can I use different flavors of ice cream?
Absolutely! Feel free to experiment with any flavor you love, from classic vanilla to fruity options.
How do I make sure my waffle cones are crispy?
Ensure your batter is well-mixed and monitor cooking time closely for perfect crispness!
Can I customize my toppings?
Yes! You can use various nuts, sprinkles, or even crushed candies as toppings instead of peanuts.
Final Thoughts
The homemade choco taco tutorial offers a delightful twist on a classic treat that everyone will love. With endless customization options, you can make these tacos your own by choosing your favorite ice cream flavors and toppings. Try this recipe today and enjoy a fun dessert that’s perfect for summer gatherings!
Homemade Choco Tacos

Create delightful Homemade Choco Tacos that bring a fun twist to your dessert game! This easy recipe features crispy chocolate waffle cones filled with your favorite ice cream, all coated in a satisfying mix of chocolate and crunchy peanuts. Perfect for summer gatherings or as a special treat at any time, these customizable tacos allow everyone to enjoy their own unique flavor combinations.
- Prep Time: 15 minutes
- Cook Time: 10 minutes
- Total Time: 25 minutes
- Yield: Approximately 12 servings 1x
- Category: Dessert
- Method: Baking
- Cuisine: American
Ingredients
- 1 cup granulated sugar
- 4 large egg whites
- 1 teaspoon vanilla extract
- ¼ teaspoon salt
- 4 tablespoons melted butter
- 6 tablespoons unsweetened cocoa powder
- 11 tablespoons all-purpose flour
- 1 gallon softened ice cream (any flavor)
- 16 oz chocolate wafers
- 1½ cups chopped peanuts
Instructions
- Combine sugar, egg whites, vanilla, salt, melted butter, cocoa powder, and flour in a large mixing bowl until smooth.
- Preheat the waffle cone maker and cook the batter for about 40-45 seconds until golden. Cool the cones on a rack.
- Softly stir ice cream until consistent. Fill cooled cones with ice cream and freeze briefly.
- Melt chocolate wafers, dip taco edges into chocolate, then into chopped peanuts.
- Return finished tacos to the freezer until ready to serve.
Nutrition
- Serving Size: 1 taco (90g)
- Calories: 320
- Sugar: 22g
- Sodium: 130mg
- Fat: 16g
- Saturated Fat: 7g
- Unsaturated Fat: 9g
- Trans Fat: 0g
- Carbohydrates: 41g
- Fiber: 3g
- Protein: 5g
- Cholesterol: 30mg


![Chocolate chip edible cookie dough for one [3 variations]](https://trandtaste.com/wp-content/uploads/2025/11/Chocolate_chip_edible_cookie_dough_for_one_3_variations_1-268x396.webp)
Leave a Comment